Breville BES870 — Technical Repair Dossier
240V/50Hz | Australia/NZ Region
⚠️ CRITICAL WARNING — AI-GENERATED PART NUMBERS
Part numbers, component specifications, and resistance values in this document have been generated by an AI model and must be independently verified before ordering or using for diagnosis. Component values can vary between production runs. Always cross-check against a verified service manual or physical measurement before purchasing parts.
Recommended verification sources:
Machine Overview
| Field | Detail |
|---|---|
| Machine Type | Semi-automatic espresso machine with integrated conical burr grinder |
| Boiler Type | Single thermocoil (thermo-block style) — not a traditional boiler |
| Heating Element | Wrap-around thermocoil element bonded to stainless tube |
| Pump | ULKA vibratory pump (15-bar rated, 9-bar operating) |
| Grinder | Integrated conical burr grinder (stainless steel burrs) |
| Rated Voltage | 240V AC / 50Hz |
| Rated Power | ~1600–1700W (heating element) |
| Pump Power | ~70W |
| Water Tank | 2.0L removable reservoir |
| Operating Pressure | 9 bar (espresso), ~1.2–1.5 bar (steam) |
| Dimensions | 390mm H × 310mm W × 400mm D (approx.) |
| Weight | ~9.5 kg |
Production Years & Variants
| Variant | Finish | Notes |
|---|---|---|
| BES870BSS | Brushed Stainless Steel | Primary AU/NZ variant |
| BES870CBL | Cranberry Red | Limited colour release |
| BES870BTR | Black Truffle | Limited colour release |
| BES870RVC | Red Velvet Cake | Limited colour release |
- Production years: Approximately 2013–present (ongoing with minor PCB and grinder revisions)
- Early units (pre-2016) have known PCB differences — see §7.
- Replaced the BES860 in the lineup; shares thermocoil architecture with BES840.
Lineup Position
BES500 (Bambino) → BES810 (Duo Temp) → BES840 (Bambino Plus)
  → BES870 (Barista Express) ← YOU ARE HERE
    → BES878 (Barista Pro) → BES880 (Barista Touch) → BES920 (Dual Boiler)
The BES870 is the entry point for integrated grinder machines. Single thermocoil means it cannot brew and steam simultaneously.
1. Component Test Table
⚠️ All resistance measurements taken at room temperature (~20–25°C) with machine unplugged and capacitors discharged. Operating voltages listed for reference only — do not probe live circuits without appropriate training and PPE.
| Component | Location | Test Method | Target Value (Room Temp) | Operating Voltage | Failure Symptoms |
|---|---|---|---|---|---|
| ULKA Pump (EP5 / EX5 series, ~70W) | Behind front fascia, lower chassis, rubber-mounted | Multimeter across pump terminals (disconnected) | ~1.1–1.3 MΩ pin-to-pin (field-verified, 240V AU vibratory pump) | 240V AC | No flow, weak pressure, loud without flow, pump hum but no water movement |
| 3-Way Solenoid Valve | Rear of group head, inline on brew path | Multimeter across coil terminals (disconnected) | ~2.2–2.5 kΩ coil resistance (field-verified, 240V AU) | 240V AC | Grounds not clearing (wet puck), coffee dripping post-shot, pressure spike |
| Thermocoil Heating Element | Wrapped around stainless brew tube, right side of chassis | Multimeter across element terminals | ~25–40Ω (low resistance, high wattage) | 240V AC | No heat, slow heat, tripping thermal fuse, RCD trip if element shorted to chassis |
| NTC Thermistor — Brew | Mounted on thermocoil body near outlet | Multimeter across NTC pins | ~10kΩ @ 25°C, ~1–2kΩ @ 90°C | 3.3–5V DC (signal voltage from PCB) | Temperature error, machine won't ready, over/under-temp brew, flashing lights |
| NTC Thermistor — Steam | Near steam wand assembly or upper thermocoil | Multimeter across NTC pins | ~10kΩ @ 25°C, ~500Ω–1kΩ at steam temp (~120°C) | 3.3–5V DC (signal voltage from PCB) | No steam, steam temp errors, steam button unresponsive |
| Thermal Fuse (One-Shot) | Clipped to thermocoil body or heating element housing | Continuity test — should read 0Ω (closed) | 0Ω (continuity) — open = blown | N/A (passive safety device) | Machine completely dead, no power at all elements, often confused with PCB failure |
| Thermostat (Resettable, if fitted) | On thermocoil or boiler body | Continuity test; check reset button if accessible | 0Ω (continuity) when cool | N/A (passive safety device) | Intermittent power loss, machine cuts out mid-session, recovers after cooling |
| PCB Fuse (Main) | On main PCB, typically near mains input connector | Continuity test or fuse tester | 0Ω (continuity) | N/A (rated ~10A 250V, verify on board) | Completely dead machine, no indicators, no response — check this before replacing PCB |
| Grinder Motor | Upper chassis, directly above portafilter area | Multimeter across motor terminals | ~10–30Ω (DC motor, varies) | 240V AC via triac on PCB | No grinding, grinding starts then stops, loud bearing noise, burning smell |
| Pressure Transducer / OPV | On pump outlet manifold | Visual + test with pressure gauge; OPV is mechanical | OPV cracking pressure: ~9–10 bar | N/A (mechanical) | Over-extraction, under-extraction, gauge needle erratic or at zero |
2. Logic Gate Sequence
The BES870 uses a microcontroller-based PCB. The following is the power-on handshake sequence as best understood from teardown analysis and service behaviour:
Power-On Sequence
MAINS CONNECTED
      │
      ▼
[1] PCB POWER RAIL INIT
    - 240V → transformer/SMPS → 5V/3.3V DC rails
    - MCU boots from firmware ROM
    FAIL → Machine completely dead. Check PCB fuse, mains wiring, SMPS stage.
      │
      ▼
[2] NTC THERMISTOR READ (Brew)
    - MCU reads brew thermistor resistance
    - Validates reading is within expected range (~5kΩ–50kΩ)
    FAIL → Brew light flashes error pattern, no heating. Replace NTC or check wiring harness.
      │
      ▼
[3] NTC THERMISTOR READ (Steam)
    - MCU reads steam thermistor
    - Validates reading is within expected range
    FAIL → Steam button errors, may still allow brew mode. Replace steam NTC.
      │
      ▼
[4] THERMAL FUSE / SAFETY CHECK
    - MCU looks for valid temperature reads as proxy for fuse integrity
    - One-shot thermal fuse is NOT monitored electronically — it simply breaks the heating circuit
    FAIL (fuse blown) → Heating element never activates. NTC reads room temp indefinitely.
      │
      ▼
[5] HEATING ELEMENT ACTIVATION
    - MCU fires triac/relay to energise thermocoil element
    - NTC temperature monitored; heating continues to brew setpoint (~92–96°C)
    FAIL → No heat. Check element resistance, triac on PCB, relay contacts.
      │
      ▼
[6] READY STATE REACHED
    - Brew temp reached; single LED or ready indicator illuminates
    - Grinder, pump, and solenoid now enabled on button press
    FAIL (temp never reached) → NTC fault, element fault, or PCB control fault.
      │
      ▼
[7] BREW BUTTON PRESS — SUB-SEQUENCE
    a. Solenoid valve opens (clears 3-way)
    b. Pump activates (~1 sec pre-infusion or direct pressure)
    c. NTC monitors temp; element cycles to maintain setpoint
    d. On shot completion: pump stops, solenoid closes (releases puck pressure)
    FAIL at (a) → Wet puck stays pressurised. Check solenoid coil and PCB drive circuit.
    FAIL at (b) → No flow. Check pump, water level sensor, inlet filter.
    FAIL at (c) → Temperature drift. NTC or PCB fault.
    FAIL at (d) → Pressurised puck, difficult to remove. Solenoid stuck closed/coil open.
3. Circuit Topography
⚠️ HIGH VOLTAGE WARNING. The main PCB carries 240V AC on the mains side. Never probe live circuits without isolation transformer, appropriate PPE, and electrical safety training. If in doubt, work only on the low-voltage DC side with the machine unplugged.
Main PCB Layout (General)
The BES870 PCB is a single board with distinct zones:
- Mains input section (top-right when facing board): Live, Neutral, Earth terminals, PCB fuse, MOV/filter caps
- Triac/relay switching section: Controls element, pump, solenoid, grinder motor
- MCU section (centre): Microcontroller, signal processing
- Low-voltage DC section: 5V/3.3V rails, NTC inputs, button/LED connectors
Test Points by Fault Type
Fault: No Power (Machine Completely Dead)
| Test Point | Expected Reading | Bad Reading | Action |
|---|---|---|---|
| Mains input to PCB (L–N terminals) | 230–240V AC | 0V | Check mains lead, wall outlet, mains switch |
| PCB fuse (in-circuit continuity, unplugged) | 0Ω | OL (open) | Replace PCB fuse (check rating on board, typically 10A 250V) |
| DC output of SMPS/transformer section | +5V DC (or +3.3V DC) | 0V or incorrect | SMPS stage failed; may need PCB replacement |
| MCU power pins | +3.3V or +5V DC | 0V | MCU not powered; upstream SMPS issue |
Fault: Machine Trips RCD on Power-On
| Test Point | Expected Reading | Bad Reading | Action |
|---|---|---|---|
| Heating element L or N to Earth (unplugged, Ω) | >1MΩ (insulation) | <100kΩ or 0Ω | Element shorted to chassis — replace thermocoil/element assembly |
| Pump terminals to Earth (unplugged, Ω) | >1MΩ | <100kΩ or 0Ω | Pump winding shorted to casing — replace pump |
| Mains filter cap across L-E or N-E | ~2–10kΩ (normal X/Y cap bleed) | 0Ω | Y-cap shorted to earth — remove/replace mains filter caps |
| MOV (metal oxide varistor) | High resistance (MΩ range) | 0Ω or very low | MOV failed short — common after power surge |
Note: Y-capacitors across L-E or N-E are a very common RCD trip cause after power surges. They are small ceramic or film caps on the PCB near the mains input. A shorted Y-cap will trip any RCD immediately.
Fault: No Heat
| Test Point | Expected Reading | Bad Reading | Action |
|---|---|---|---|
| Thermal fuse (continuity, unplugged) | 0Ω | OL | Thermal fuse blown — replace; investigate root cause (NTC fault, blocked thermocoil) |
| Heating element resistance (unplugged) | ~25–40Ω | OL or >100Ω | Element open circuit — replace thermocoil assembly |
| NTC thermistor resistance | ~10kΩ @ 25°C | OL or 0Ω | NTC failed — replace thermistor |
| Triac/relay switching heating element | Should switch 240V when heated | No voltage change | Triac/relay failed on PCB |
Fault: No Pump Activation
| Test Point | Expected Reading | Bad Reading | Action |
|---|---|---|---|
| Pump supply voltage at pump connector (live, brew button pressed) | 240V AC | 0V | PCB not driving pump — check triac, PCB drive circuit |
| Pump resistance (unplugged) | ~1.1–1.3 MΩ pin-to-pin | OL or 0Ω | Pump coil open or shorted — replace pump |
| Water level sensor signal (DC logic) | Logic HIGH (~3.3–5V) when tank full | 0V (no tank detected) | Tank not seated / sensor fouled / sensor failed |
| Inlet filter restriction | Low flow test (tubing disconnected) | No flow or drip | Clogged inlet filter — clean or replace |
Fault: Pump Runs Immediately at Power-On / Water Dumps to Drip Tray
| Test Point | Expected Reading | Bad Reading | Action |
|---|---|---|---|
| Pump behaviour at idle immediately after power-on | Pump OFF until commanded | Pump runs instantly at idle | Strongly suspect board-side pump drive fault |
| Pump supply voltage at idle (live, just powered on) | 0V AC | ~240V AC immediately | Control board is energising pump when it should not — replace/repair board |
| 3-way solenoid coil resistance (unplugged) | ~2.2–2.6 kΩ | OL or very low Ω | Coil fault if out of range, but normal reading does not clear the board |
| 2-way solenoid coil resistance (unplugged) | ~2.2–2.6 kΩ | OL or very low Ω | Same — use as a coil sanity check only |
| Visual PCB inspection | Sometimes heat/burn evidence | Looks normal | A healthy-looking PCB can still have a failed triac / pump-drive path |
4. Common Failure Points
⚠️ Part numbers below are AI-estimated. Verify all part numbers at Breville Parts AU, Espresso Parts AU, or iFixit before ordering.
| Rank | Component | Failure Mode | Symptoms | Estimated Part Number | Verification Source |
|---|---|---|---|---|---|
| 1 | Thermocoil / Heating Element | Limescale buildup → overheat → thermal fuse trips | Machine dead after hard water use; no heat; thermal fuse blown | SP0001449, SP0001632 (verify) | Breville Parts AU, Espresso Parts AU |
| 2 | One-Shot Thermal Fuse | Trips due to overheating (often limescale-induced) | Machine completely dead, no indicators at all | Generic: 184°C, 10A thermal fuse (verify amperage on unit) | Espresso Parts AU, element suppliers |
| 3 | ULKA Pump (EP5/EX5) | Winding failure or seized | Loud hum, no water movement; weak/no pressure | SP0001958, ULKA EP5 (verify) | Espresso Parts AU, iFixit |
| 4 | 3-Way Solenoid Valve | Coil burnout or mechanical blockage | Wet puck (pressure not clearing), coffee dripping after shot | SP0001449 (verify — valve assembly) | Breville Parts AU |
| 5 | NTC Thermistor (Brew) | Drift or open circuit | Machine won't reach ready, temperature errors, flashing indicators | SP0002178 (verify) | Breville Parts AU, iFixit |
| 6 | Y-Capacitor on PCB | Fails short after power surge | Immediately trips RCD on power-on | Generic X2/Y2 cap (match PCB rating, typically 10nF–100nF 250–400V) | Electronics suppliers |
| 7 | Grinder Burrs (Lower/Upper) | Wear, chipping from debris | Inconsistent grind, no grind, loud grinding noise, grinding stops | SP0000765, SP0001840 (verify) | Breville Parts AU, iFixit |
| 8 | Main PCB | Triac failure, SMPS failure, MCU corruption | Intermittent operation, no pump drive, no heat drive despite good components | SP0001770 (verify — PCB assembly) | Breville Parts AU |
5. Diagnostic Trees
Fault Tree 1: No Pressure / Weak Shot
SYMPTOM: No pressure or very weak espresso shot
              │
              ▼
IS THERE ANY WATER FLOW INTO THE CUP?
    │                         │
   YES                        NO
    │                         │
    ▼                         ▼
Is the gauge reading      Is pump audible/running?
below 6 bar?                  │              │
    │                        YES             NO
   YES                        │              │
    │                         ▼              ▼
    ▼                   Check OPV:      Check pump
Check grind size:       - Loosen OPV    supply voltage
Is it too coarse?         spring        at connector.
    │       │             - If OPV       0V → PCB/triac
   YES      NO            stuck open:    fault.
    │       │             replace OPV    240V present
    ▼       ▼             assembly.      → replace pump.
Adjust     Check
grinder    portafilter basket:
finer.     - Cracked/worn basket?
           - Replace basket.
           - Check dose weight
             (should be ~18–21g).
           - Tamping pressure okay?
           ↓
           If all above OK:
           Check pump output
           pressure with gauge.
           <9 bar → Pump weak
           → Replace ULKA pump.
Fault Tree 2: Machine Trips RCD on Power-On
SYMPTOM: RCD/safety switch trips immediately when machine is switched on
              │
              ▼
UNPLUG MACHINE. Test mains lead continuity.
Lead OK? → YES
              │
              ▼
OPEN MACHINE. Visually inspect PCB for burn marks,
swollen/cracked capacitors near mains input.
Visible damage?
    │                    │
   YES                   NO
    │                    │
    ▼                    ▼
Identify burned       Disconnect heating element leads.
component. Y-cap?     Plug in and switch on (briefly, 5s max).
Replace Y-cap         RCD trips?
(match rating).           │              │
                         YES             NO
                          │              │
                          ▼              ▼
                    Disconnect        Reconnect element.
                    pump leads.       Disconnect pump leads.
                    RCD trips?        RCD trips?
                      │    │              │         │
                     YES   NO            YES        NO
                      │    │              │         │
                      ▼    ▼              ▼         ▼
                  PCB  Pump is    Element shorted  Reconnect pump.
                 fault shorting   to chassis →     Disconnect
                 (MOV, earth →    Replace          solenoid valve.
                  cap, triac) →   thermocoil       Continue
                  replace PCB.    assembly.        elimination...
                                                   (solenoid or
                                                    grinder motor
                                                    shorting earth)
Fault Tree 3: Pump Runs Constantly at Power-On / Water Dumps to Drip Tray
SYMPTOM: Pump starts immediately when machine is powered on
and water dumps continuously to drip tray
              │
              ▼
DOES THE PUMP START BEFORE ANY BREW/STEAM COMMAND?
    │                         │
   YES                        NO
    │                         │
    ▼                         ▼
Measure pump voltage      Use normal brew/steam
at idle (live test).      fault trees instead.
Pump seeing mains?
    │                 │
   YES                NO
    │                 │
    ▼                 ▼
Board is energising   Re-check observation,
pump at idle.         wiring reference, and
Most likely fault:    whether another load is
pump-drive triac /    being mistaken for pump.
board output failure.
    │
    ▼
Check solenoid coil resistances
(3-way / 2-way) as sanity check.
Normal ~2.2–2.6kΩ?
    │                 │
   YES                NO
    │                 │
    ▼                 ▼
Board fault remains   Valve coil fault may also
lead suspect.         exist, but it does not
A normal coil         explain full mains to the
reading does not      pump at idle.
clear the PCB.
    │
    ▼
Inspect board / trace pump drive path.
No obvious burn marks?
    │                 │
   YES                NO
    │                 │
    ▼                 ▼
Still suspect board.  Repair obvious PCB damage
Triac failures often  if practical; otherwise
look visually normal. replace board.
    │
    ▼
Confirmed field fix:
replace main board.
Fault Tree 4: No Steam / Low Steam Pressure
SYMPTOM: No steam, or steam is weak/watery
              │
              ▼
Does machine reach BREW READY state normally?
    │                         │
   YES                        NO
    │                         │
    ▼                         ▼
Press steam button.      Diagnose brew fault first
Does heating indicator   (see Fault Tree 1 / §3).
light during steam heat?
    │                │
   YES               NO
    │                │
    ▼                ▼
Wait 45–60s.     Check steam NTC:
Does steam       - Unplug, measure resistance
build?           - ~10kΩ @ 25°C expected
    │    │       - OL or 0Ω → replace NTC.
   YES   NO      - If NTC OK, PCB not driving
    │    │         element in steam mode →
    ▼    ▼         PCB fault.
 OK.  Is steam
      wand/tip
      blocked?
        │      │
       YES     NO
        │      │
        ▼      ▼
     Clean   Is steam
     tip &   weak/watery?
     wand.       │       │
                YES      NO
                 │        │
                 ▼        ▼
           Is thermocoil   Likely intermittent
           scaled up?      steam NTC → monitor,
           Descale per     replace if recurs.
           Breville guide.
           Still weak?
           → Thermocoil
             damaged;
             replace.
6. Manual & Resource Search Strings
Internal Service Manual
Scribd:
"Breville BES870 service manual"
"BES870 repair manual filetype:pdf"
"Breville Barista Express 870 technical manual"
Google:
site:scribd.com "BES870" service
"BES870BSS" "service manual" OR "repair manual" filetype:pdf
"Breville BES870" schematic OR "wiring diagram" OR "circuit diagram"
iFixit:
- Direct URL:
https://www.ifixit.com/Device/Breville_Barista_Express - Search:
Breville Barista Express BES870 teardown
Circuit Schematics
Google:
"BES870" "circuit diagram" OR "schematic" filetype:pdf
"Breville 870" PCB schematic
"BES870BSS" wiring diagram
Scribd:
"Breville espresso 870 schematic"
"BES870 PCB diagram"
Note: Full circuit schematics for the BES870 are not widely available publicly. The best alternative is the iFixit teardown photo set, which provides sufficient visual reference for component location. Espresso community forums (Home-Barista.com, CoffeeSnobs.com.au) sometimes host or link to partial schematics.
Exploded Parts Diagram
Breville Parts AU:
- Search:
BES870BSSonhttps://www.breville.com/en-au/support/parts-accessories.html - The parts finder includes an interactive exploded diagram with Breville part numbers.
Google:
"BES870" exploded view OR "parts diagram" OR "parts list"
"BES870BSS" "spare parts" diagram
Scribd / Forums:
"Breville BES870 parts diagram"
site:coffeeforums.co.uk OR site:home-barista.com "BES870" parts
7. Known Quirks & Gotchas
Production Run Variations
- Pre-2016 units have an older PCB revision with slightly different triac layout. NTC connector pinout may differ — check harness before replacing NTC.
- Post-2019 units introduced a revised grinder motor drive circuit. Some early replacement PCBs sourced for older machines are not compatible — always match PCB revision when ordering.
- Grinder burr set changed mid-production (coarser grind adjustment on later units). Burrs from early units may not seat correctly in later grinder housings.
- The OPV (over-pressure valve) spring tension was revised in some production runs. If replacing OPV, note that generic "9 bar" OPVs may need adjustment.
Known Firmware / Software Issues
- The BES870 has no user-accessible firmware update mechanism. MCU firmware is factory-programmed.
- Some units exhibit a "stuck in pre-infusion" behaviour where the pump cycles but never builds pressure — often misdiagnosed as PCB firmware fault; usually a failing pump or partially blocked OPV.
- The dose timer (volumetric) can drift over time — recalibrate by holding the 1-cup and 2-cup buttons per user manual.
Undocumented Failure Modes
- Thermocoil O-ring failure: The small O-rings sealing the thermocoil inlet/outlet can degrade and cause internal leaks that don't appear as external drips but cause pressure loss and intermittent NTC errors.
- Grinder magnetic sensor drift: The grinder dose control uses a hall-effect-style sensor. If the grinder motor magnet wears or shifts, dose grinding becomes erratic without any error code.
- Water tank reed switch: The tank-present detector can give false negatives if the magnet in the tank shifts. Machine refuses to pump despite full tank.
- Solenoid valve scale bridging: In hard water areas, scale can bridge the solenoid valve plunger, causing it to appear stuck open or closed. Descaling may resolve without replacement.
Common Repair Mistakes
- Replacing the PCB before checking the thermal fuse. A blown thermal fuse mimics a dead PCB perfectly — always check thermal fuse first (£2 part vs £80+ PCB).
- Not descaling before replacing thermocoil. If scale caused the thermal fuse to blow, fitting a new thermocoil without descaling will blow the new fuse too.
- Incorrect pump orientation on reinstall. ULKA pump has a specific flow direction — inlet and outlet are marked; reversing causes no flow.
- Over-tightening thermocoil fittings. The brass fittings are easily stripped. Hand-tight plus ¼ turn is sufficient with fresh O-rings.
- Ignoring the 3-way solenoid after pump replacement. If pump was replaced due to "no pressure", but solenoid is also partially failed, the new pump won't fix the symptom.
- Not checking earth continuity after repair. The thermocoil chassis earth bond must be intact — always verify earth continuity to the chassis before reassembly.
AU-Specific Notes (240V vs 110V)
- The AU 240V BES870 is a distinct model from the US BES870XL (120V/60Hz). Components are NOT interchangeable:
- The ULKA pump in AU units is wound for 240V. US units use 120V pump — never swap these.
- The heating element in AU units is rated 240V; US element will burn out immediately if fitted.
- PCBs are region-specific. US PCBs cannot drive AU heating loads.
- The AU unit is protected by a 3-pin plug with fused active. The fuse in the mains plug is typically 13A (AS/NZS 3112). A blown plug fuse is sometimes the actual fault — check this first before opening the machine.
- Australian water hardness varies dramatically. Melbourne (soft) vs Brisbane/Perth (hard) — machines in hard water areas will suffer thermocoil scaling ~2–3× faster. Breville recommends descaling every 2–3 months in hard water areas.
8. Cross-References
Shared Components Across Breville Models
| Component | BES870 | BES840 | BES878 | BES880 | BES920 |
|---|---|---|---|---|---|
| ULKA Pump (240V) | ✅ | ✅ | ✅ | ✅ | ✅ (dual pump variant) |
| 3-Way Solenoid Valve | ✅ | ✅ | ✅ | ✅ | ✅ |
| NTC Thermistor (10kΩ) | ✅ | ✅ | ✅ | ✅ | ✅ (different config) |
| Thermocoil Assembly | ✅ (single) | ✅ (single) | ✅ (single) | ✅ (single) | ❌ (dual boiler) |
| Thermal Fuse | ✅ | ✅ | ✅ | ✅ | ✅ |
| Grinder Burr Set | ✅ (conical) | ❌ (no grinder) | ✅ (conical, revised) | ✅ (conical) | ❌ (no grinder) |
| Water Tank / Seal | ✅ | ✅ (check dims) | ✅ | ✅ | Different |
| Group Head Seal | ✅ | ✅ | ✅ | ✅ | ✅ |
⚠️ "Shared" indicates functional compatibility; always verify part numbers before cross-ordering as Breville may use the same component under different part numbers per model.
OEM Component Equivalents
| Component | OEM / Breville Part | Industry Equivalent | Notes |
|---|---|---|---|
| ULKA Pump | SP0001958 (verify) | ULKA EP5 240V / EX5 240V | ULKA (Ceme) is the OEM. Order directly from Espresso Parts AU for confirmed AU voltage spec. |
| Group Head Gasket | SP0000851 (verify) | 8.5mm × 57mm × 65mm — fits most 58mm group heads | Standard 58mm group head seal; many generic equivalents available. |
| Portafilter Basket (Single/Double) | SP0001770 (verify) | Standard 58mm IMS, VST baskets | 58mm is industry standard; aftermarket precision baskets are direct drop-in upgrade. |
| OPV Spring/Assembly | SP0001265 (verify) | Generic 9-bar OPV for ULKA pump line | Ensure rated for 15-bar pump, set to 9-bar cracking. |
| NTC Thermistor | SP0002178 (verify) | 10kΩ @ 25°C NTC, B-value ~3950K, M3 screw or push-fit | Source from Breville Parts AU or match B-value exactly for accuracy. |
| Thermal Fuse | N/A — generic | Microtemp G4A 184°C 10A 250V (verify amperage on unit) | Must match trip temperature stamped on original. Do not uprate. |
Useful Community Resources (AU)
- CoffeeSnobs.com.au — active AU espresso community, BES870 repair threads
- Home-Barista.com — international but has BES870 technical threads
- Reddit r/espresso — search
BES870 repair - iFixit Q&A — BES870XL — community repair questions
9. Official Parts List & Diagrams
Spare Parts List PDF
The official Breville BES870 spare parts list (AU/NZ, US, CA) is available here:
📄 BES870 Spare Parts List (PDF) — sourced from thebrewratio.com
This document contains:
- Full numbered parts list with AU/NZ (
BES870/XX.XX) and SP (SP0XXXXXX) part codes - Component descriptions for every serviceable part
- Regional variants (AU/NZ vs US/CA) clearly marked
- Production run version callouts (Version A, PDC date codes)
Confirmed AU/NZ Part Codes (from official document):
| Component | AU/NZ Code | SP Code | Notes |
|---|---|---|---|
| Solenoid Valve Assy | BES870/02.14 | SP0001535 | 3-way, AU/NZ spec |
| Solenoid Valve (OLAB 5878) | — | — | Pre-PDC1630 production |
| Solenoid Valve (CEME V397VN1.0P) | — | — | Post-PDC1630 (Version A) |
| Triac with PCB | — | SP0010239 | AU/NZ heating control board |
| Portafilter Locator | BES870/01.06 | SP0001558 | |
| Base Cover (Kapton tape version) | BES870/01.13 | SP0001560 |
⚠️ The parts list PDF has a multi-column layout — part codes, SP codes, and descriptions span separate columns. Cross-reference visually in the PDF rather than relying on text extraction.
Exploded Diagrams
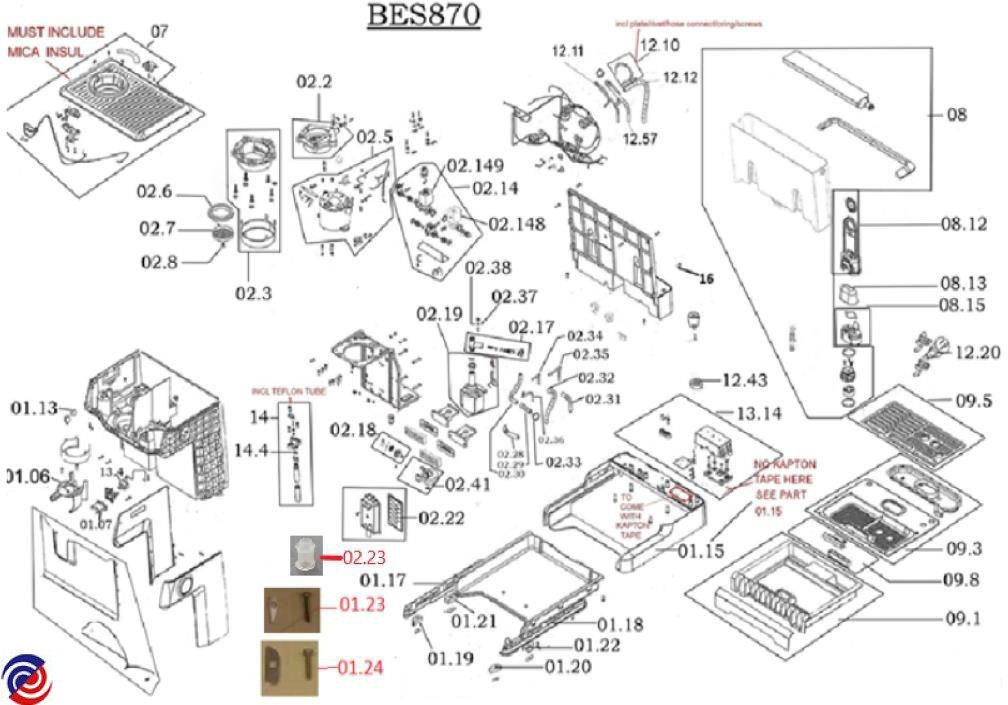
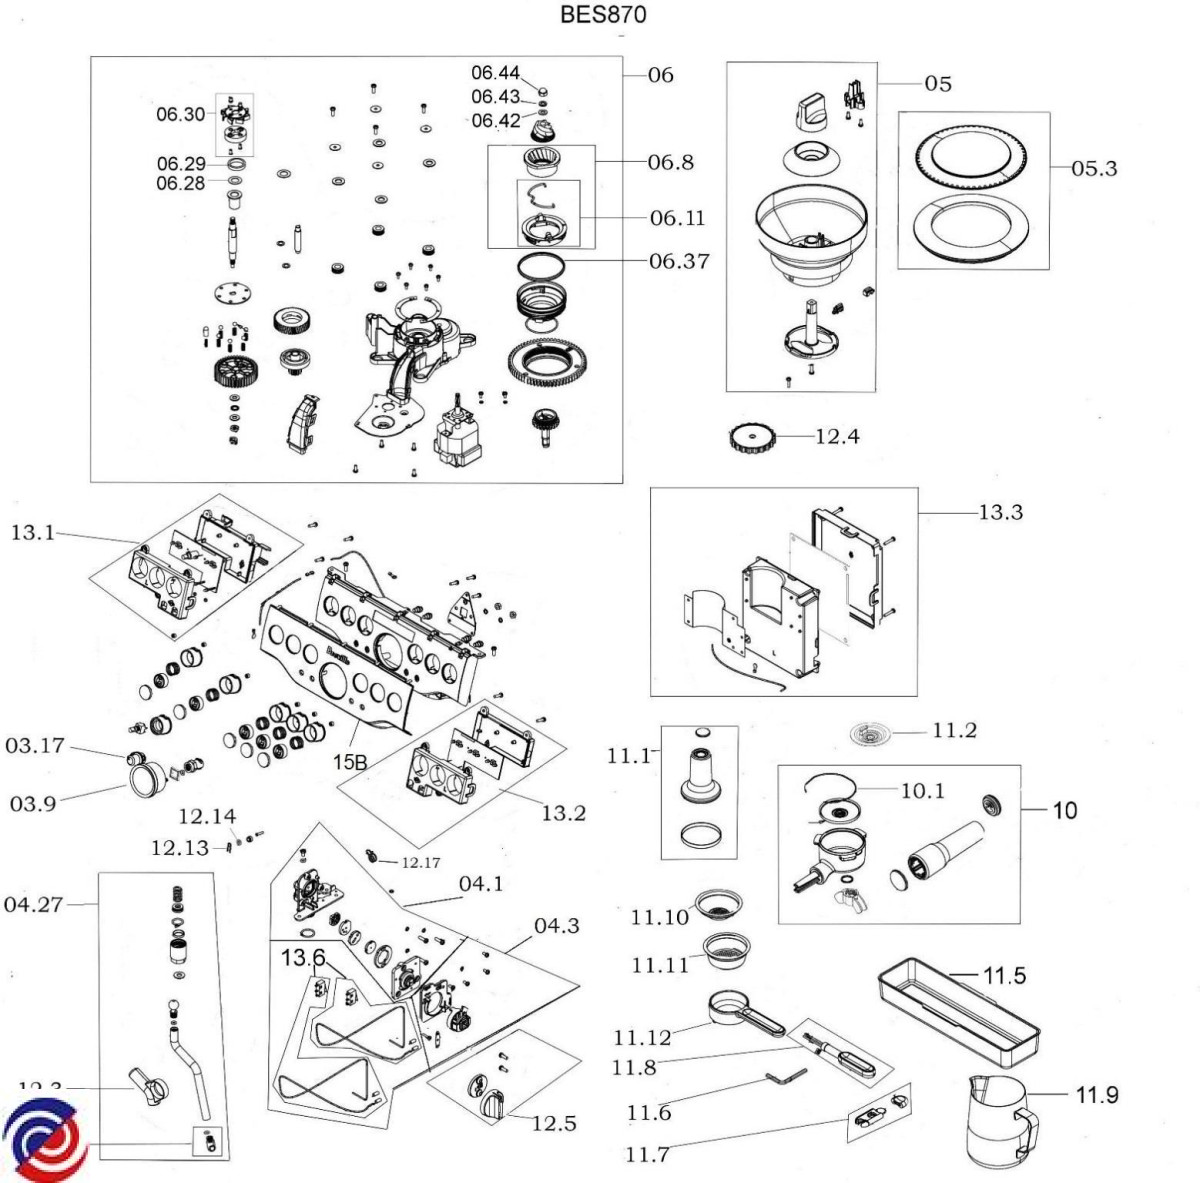
Source: QLD Appliance Parts
For the interactive parts catalogue with individual component photos and pricing:
- 🔗 QLD Appliance Parts — BES870 — AU supplier with exploded diagrams + individual part photos
- 🔗 Breville Parts AU — official, search BES870 for interactive exploded view
YouTube Repair References
Search YouTube for: Breville BES870 repair / BES870 disassembly / BES870 pump replacement
Key channels to check:
- Whole Latte Love — professional teardowns and repair walkthroughs
- Seattle Coffee Gear — maintenance and repair guides
- Community repair videos often show real fault diagnosis on AU machines
Dossier generated by AI (Claude / Sushi). All specifications, part numbers, and resistance values must be independently verified. This document is a repair aid, not a certified service manual. Work on mains-voltage appliances carries risk of electric shock and fire — if in doubt, engage a qualified electrician or authorised Breville service centre.
Last updated: March 2026